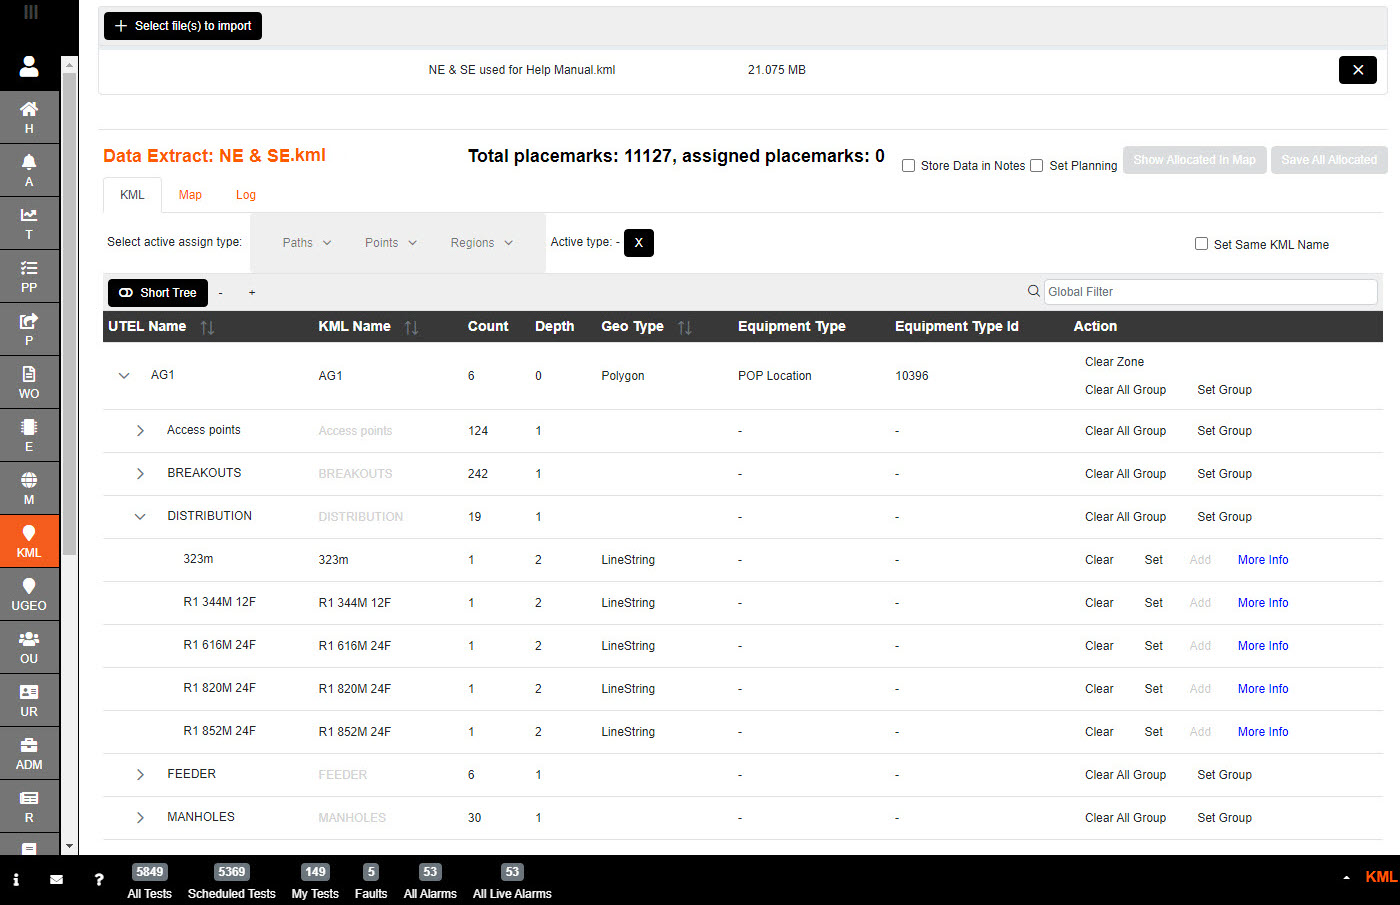
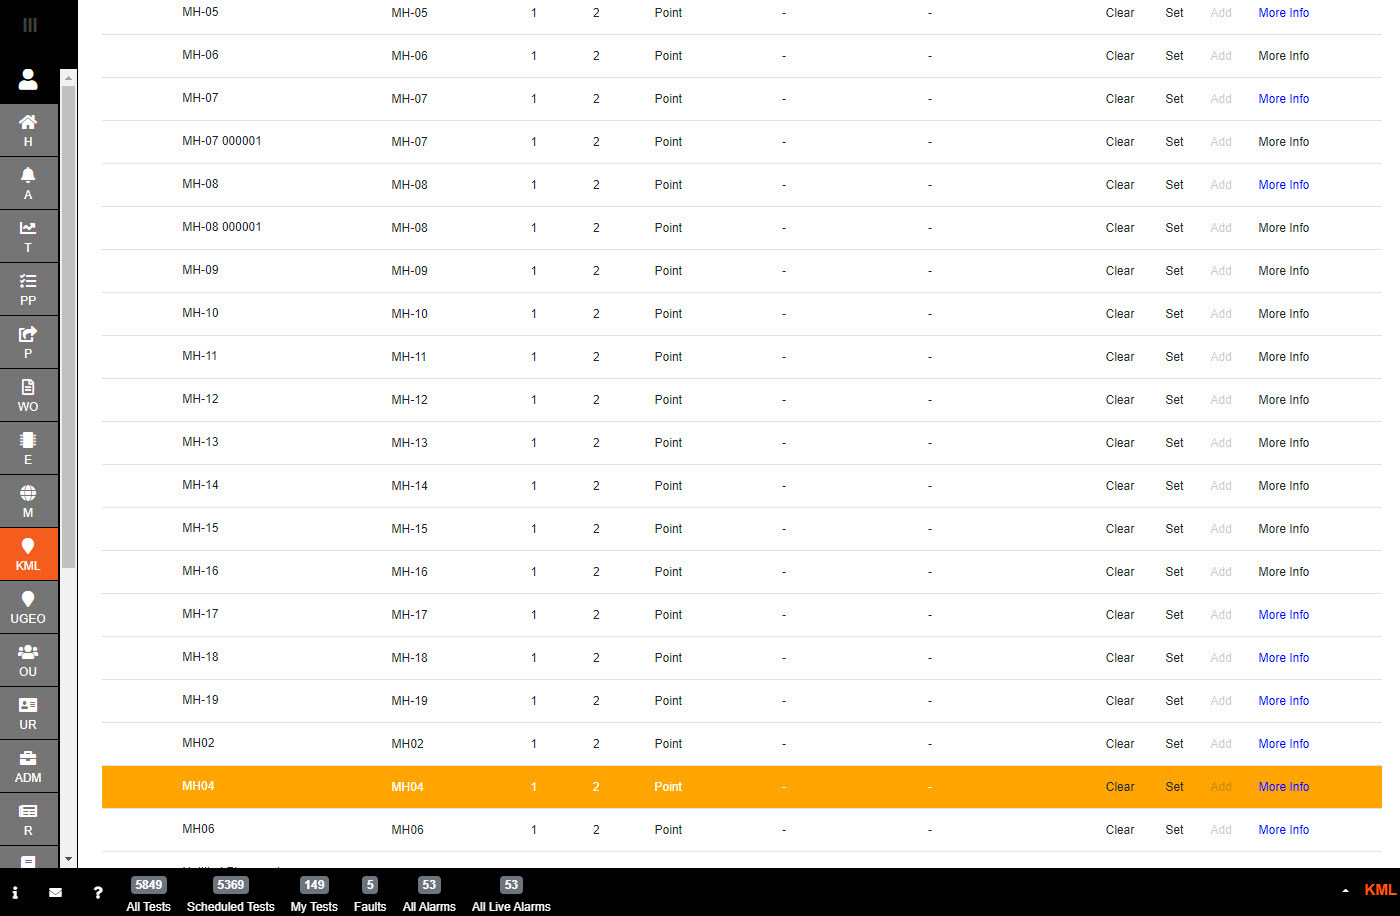
KML Load displays the tree extracted from the KML file.
Select a type from the drop downs and then use 'Set' and 'Set Group' buttons to apply the type to a single row or all sub rows that are not folders.
Use the 'Clear' button to remove an assignment.
Tick 'Set Same KML Name' to set items with the same KML Name
The full folder contents are applied when creating UGEO even if short view is active.
A Short Tree will initially be displayed.
This limits folder contents to a few items (rather than all in each folder).
+/- buttons are disabled for the full tree as the row count can easily be massive.
Use the tree toggle button to switch between short tree view, and full tree view.
Use the Global filter box to filter rows displayed. This is applied to the 'Name' column.
Note: KML name showing light gray should not be assigned as it has potentially no geo info
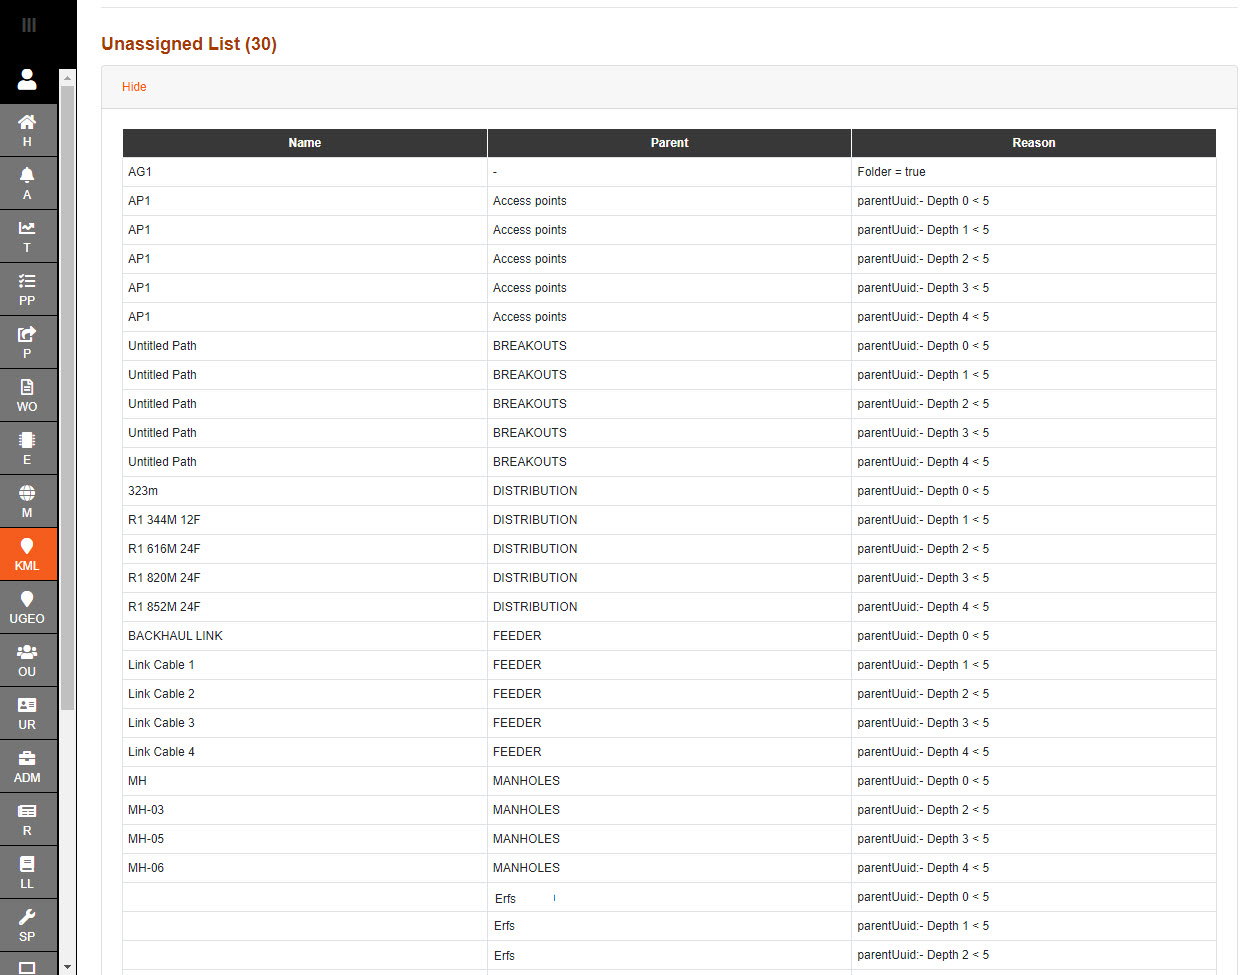
The Unassigned List table below the tree summaries what has not been assigned in the tree (this shows the 5 limited view permanently unless full tree view is enabled).
Simply click on a row to navigate to the item in the tree.
Assigning the item removes the item (and same type items in same folder) from the table.
This makes it very easy to home in on remaining unset items in the tree.
Hovering over 'More Info' allows you to see the info stored about the item from the file.
This will help towards creating the correct set up as expected.

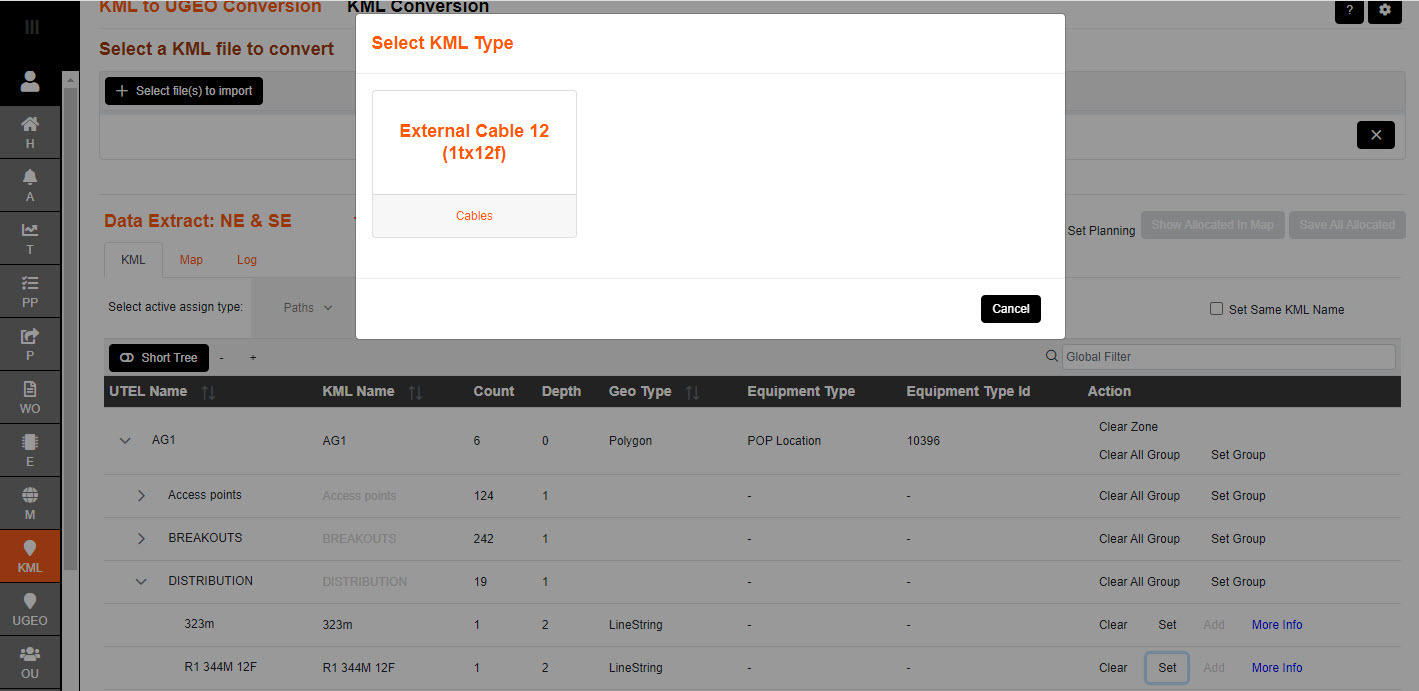
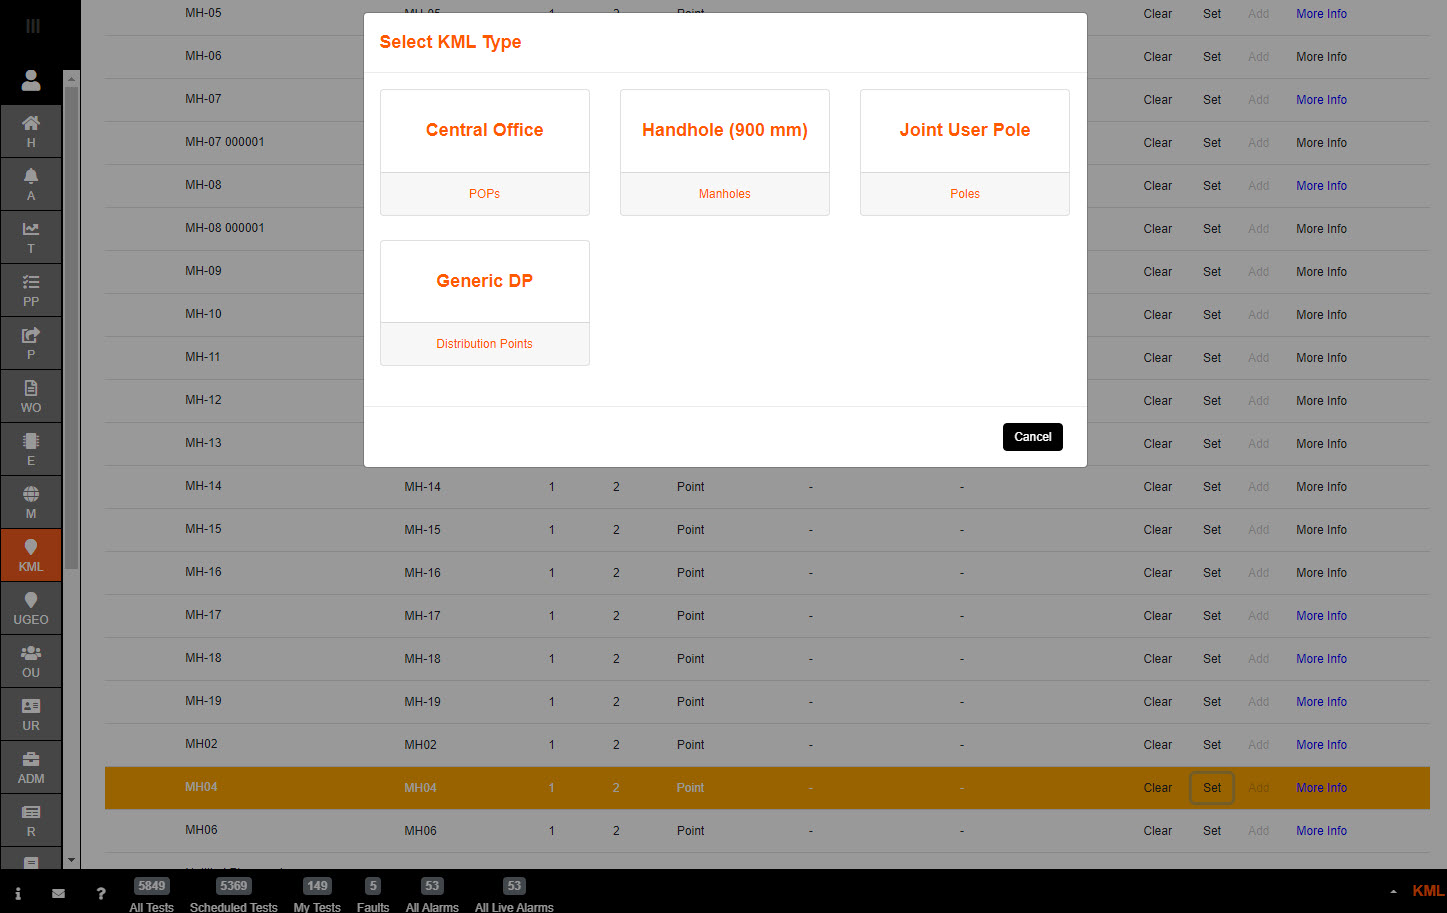
Select 'Set' and the KML Type will either pop up from your previously set up 'auto select', or from the 'active assign type' selected above the tree.
If the Active type is available but incorrect - then select the clear selection x button in order for your default Auto Select option to apply.
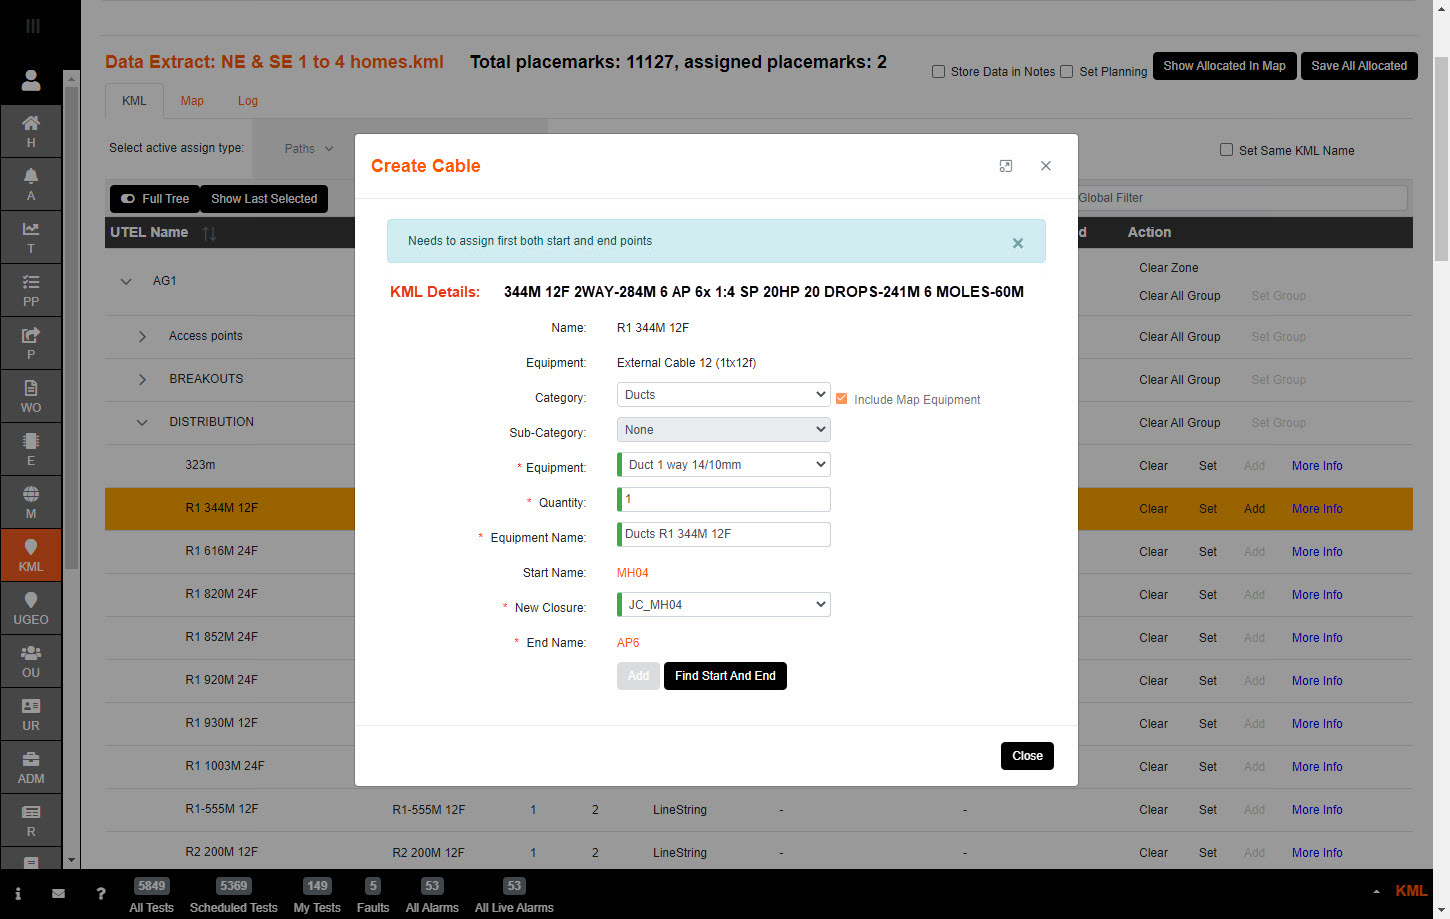
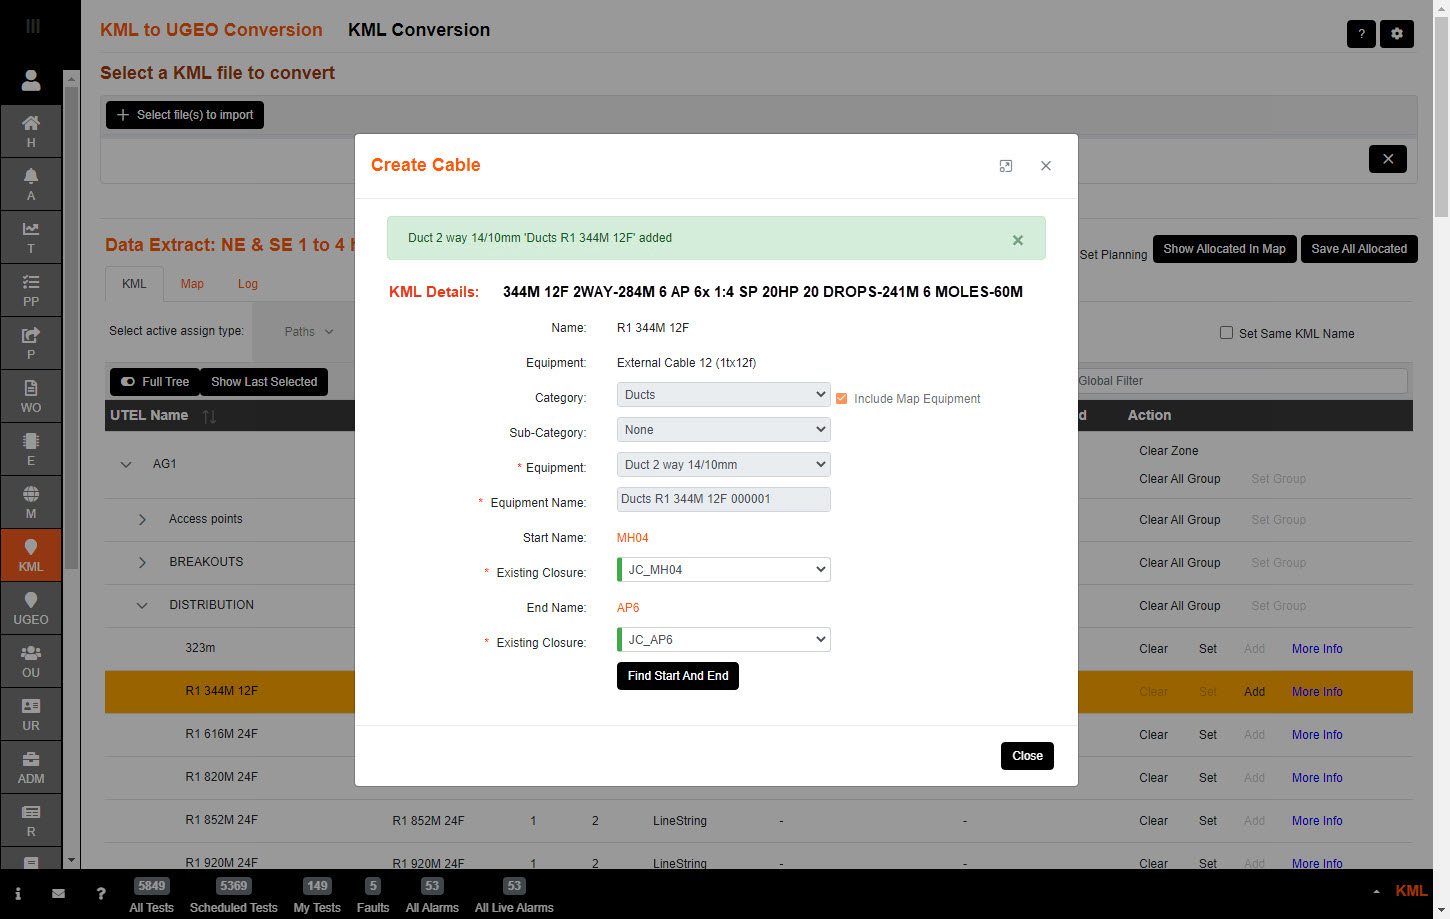
Click on the 'External Cable 12 (1tx12f)' if the correct cable is offered. If not then click on 'Cables' in order to get a chance to change the type.
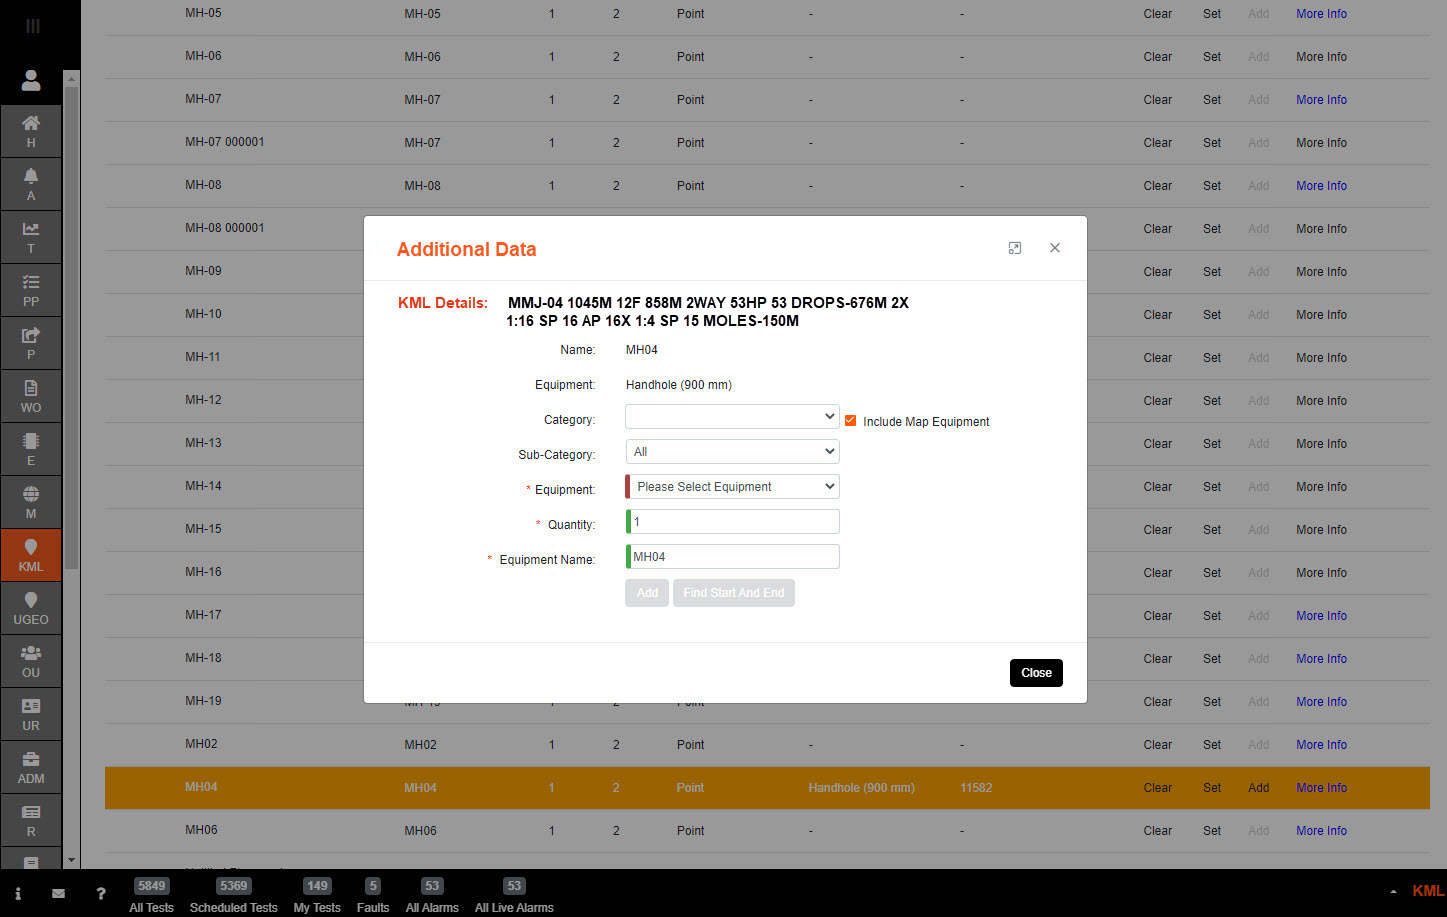
After setting the cable type, select 'Add' and a pop up is presented to allow Additional Data to be added.
In this case - the 'Duct' needs to be added as shown in the KML Details.
Note: Splitters need to be added to the start and end closures even if shown on the cable KML Details.
Note: Any fiber connections need to be manually done (after importing the UGEO) as this is not an option currently.
A cable item will only be possible to assign after the Start item (MH04) and End item (AP6) have been added.
There is a hyperlink available in order to identify the items easily. Click on MH04.
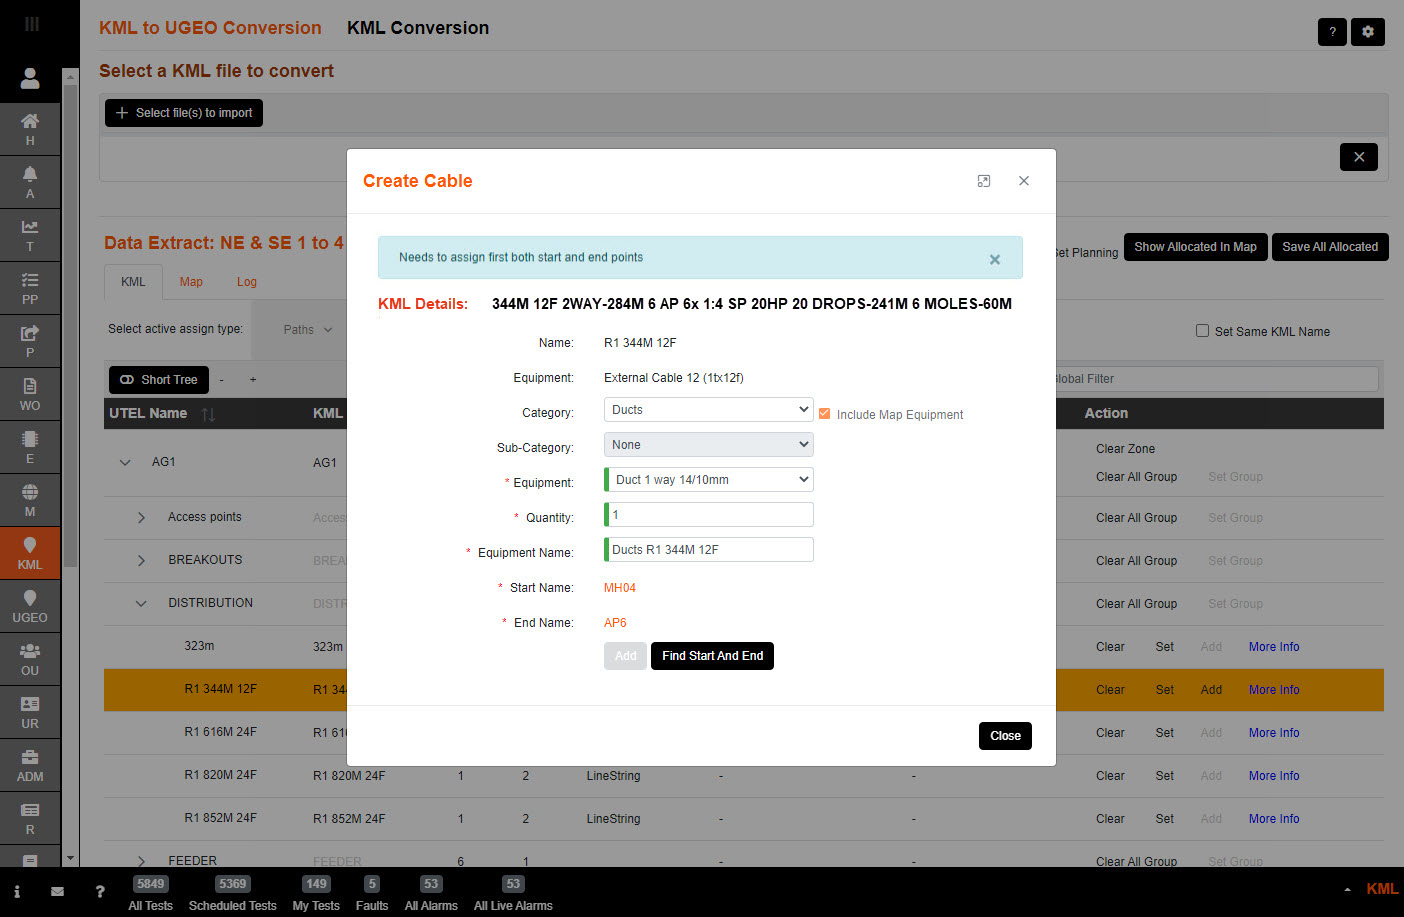
The hyperlink will highlight the item in the tree.
If the tree is in Short mode - you will need to open it up in order to find the item highlighted.
Select 'Set' and the KML Type will either pop up from your previously set up 'auto select', or from the 'active assign type' selected above the tree.
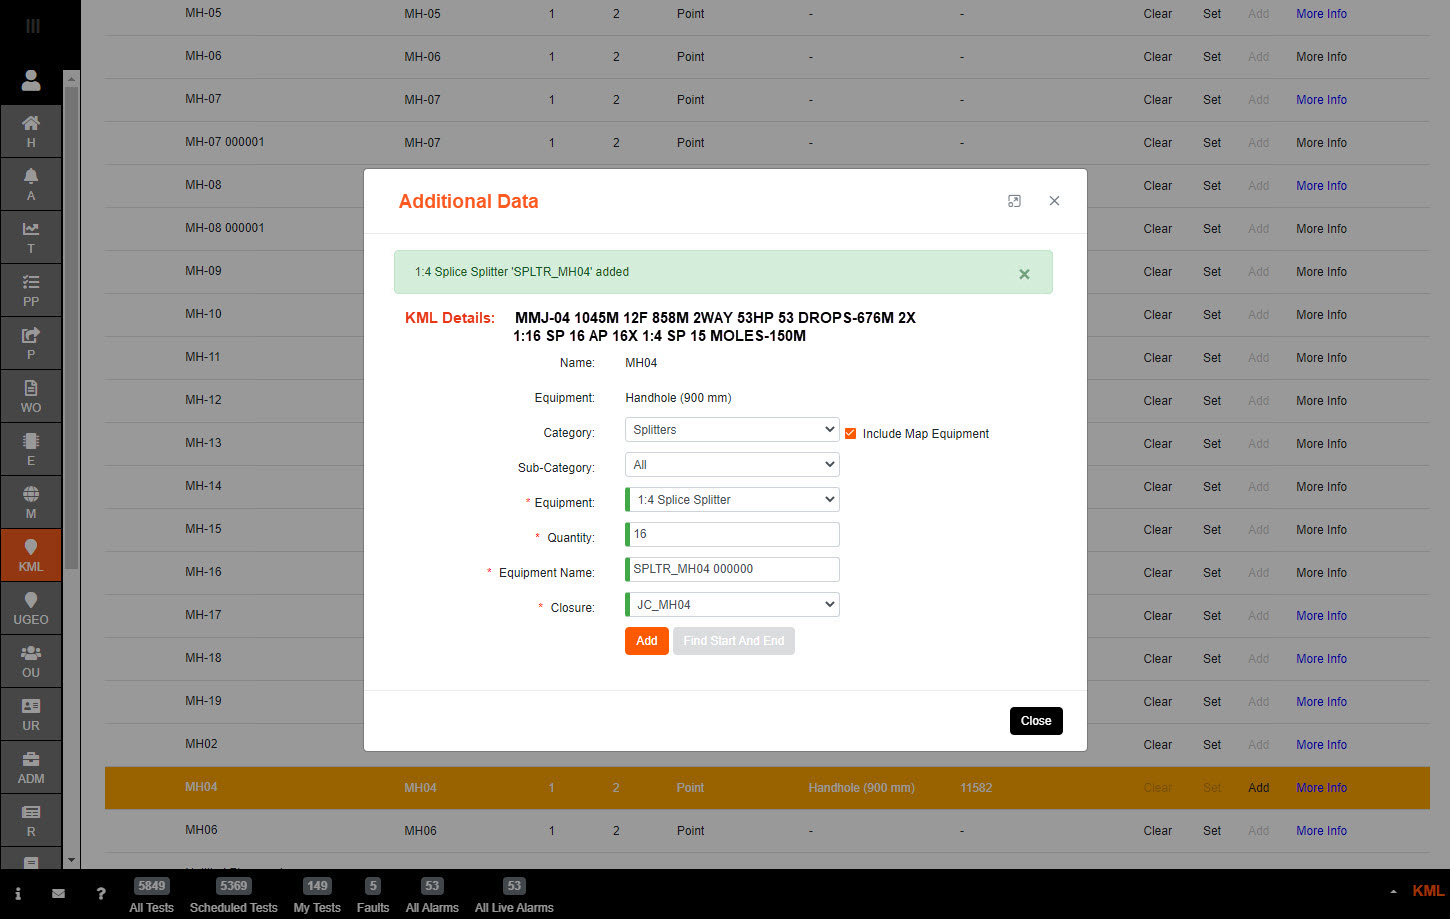
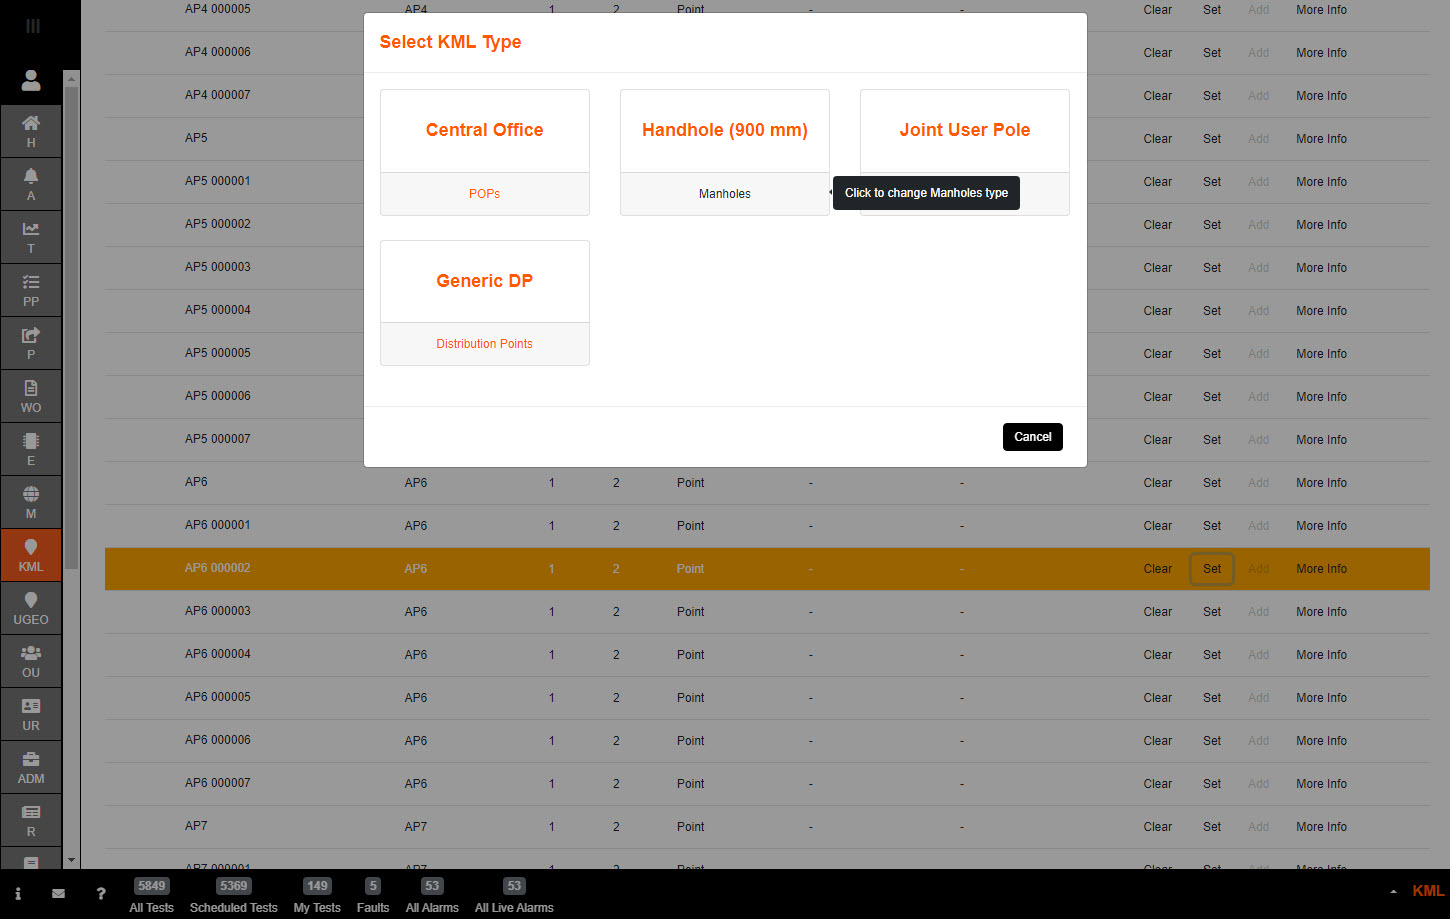
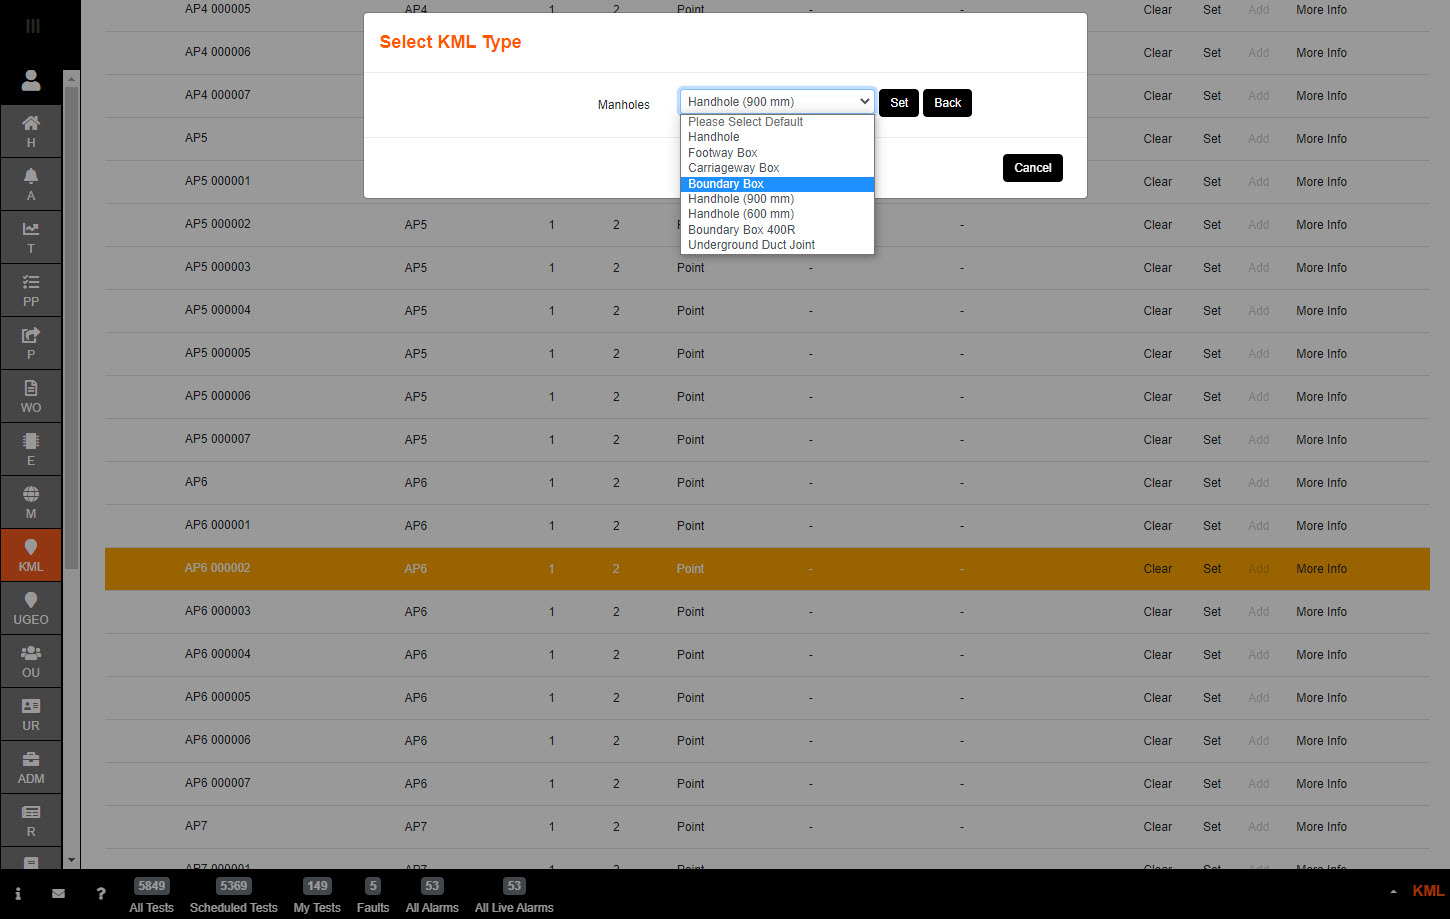
Click on the 'Handhole (900mm)' if the correct manhole is offered. If not then click on 'Manholes' in order to get a chance to change the type.
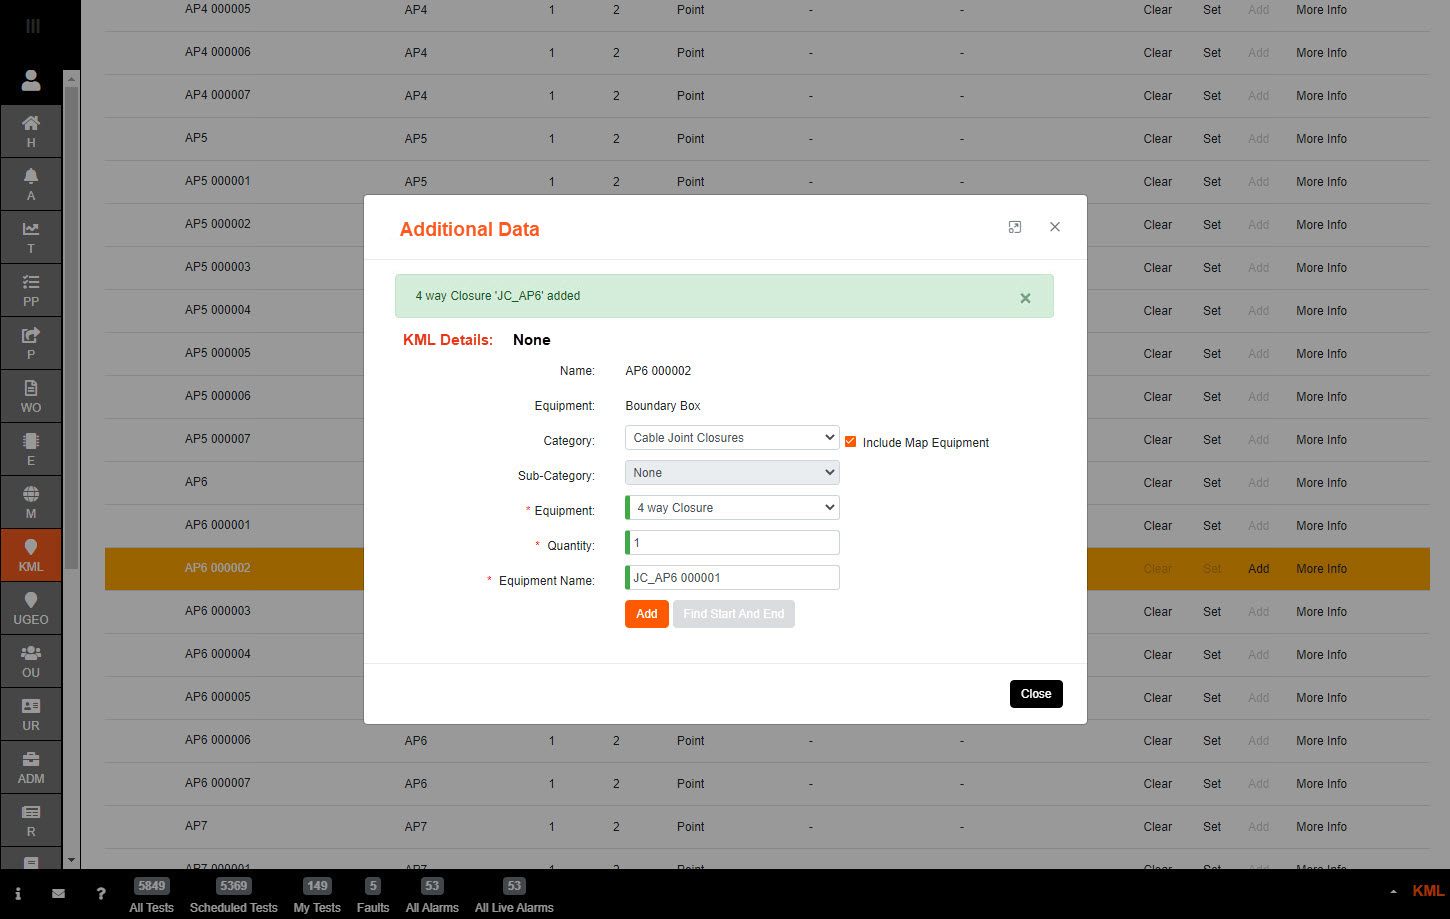
After setting the manhole type, select 'Add' and a pop up is presented to allow Additional Data to be added.
In this case - the 'Closure' required for the cable, and then the 'Splitters' as shown in the KML Details.
Select the Category drop down and click on 'Cable Joint Closures'.
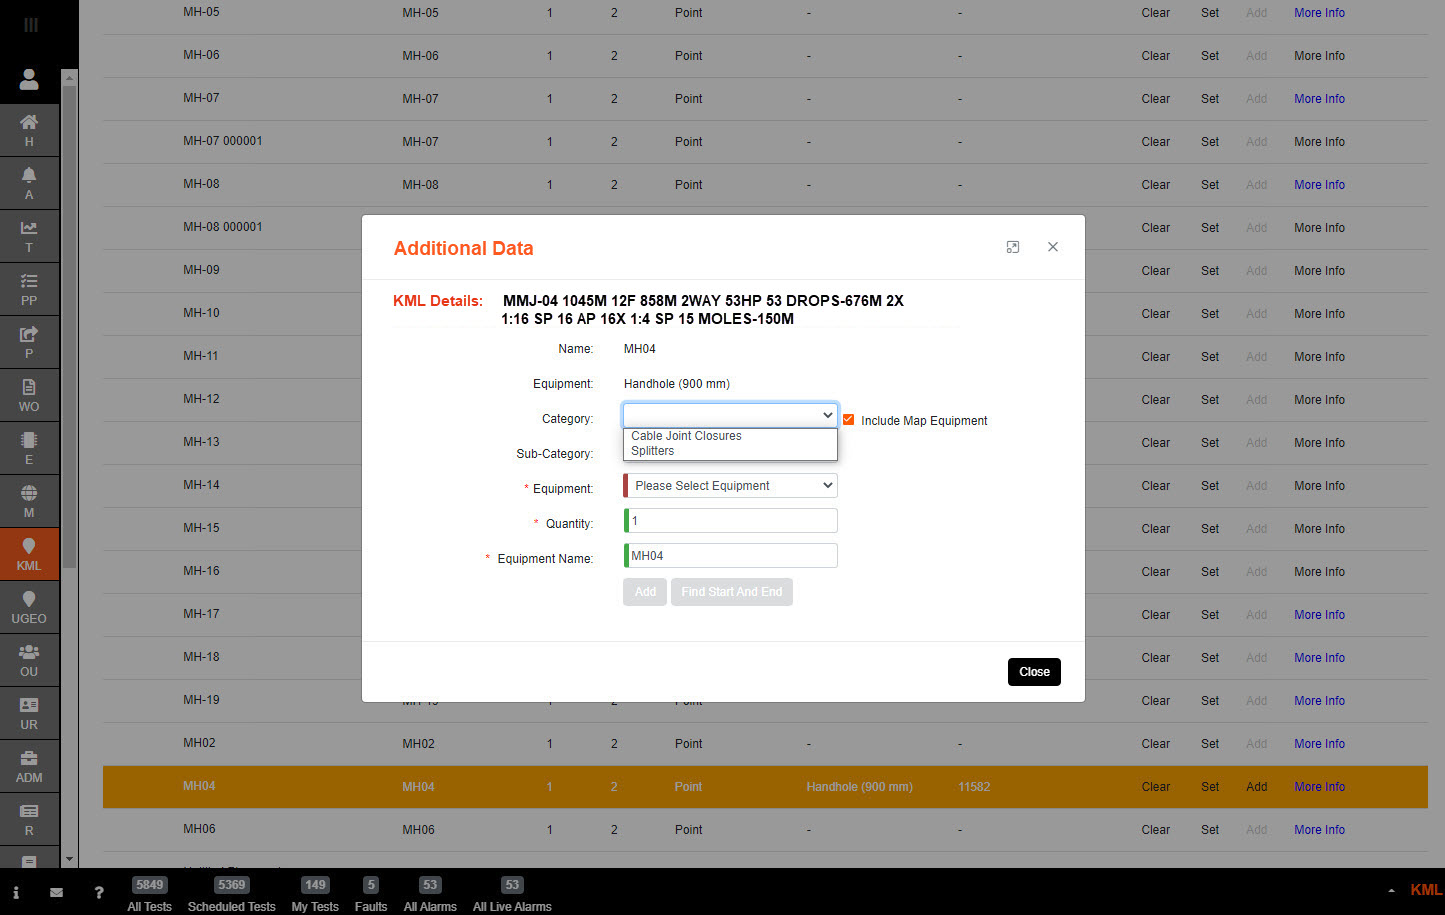
Next choose the type of joint closure you will need to create in the Equipment drop down
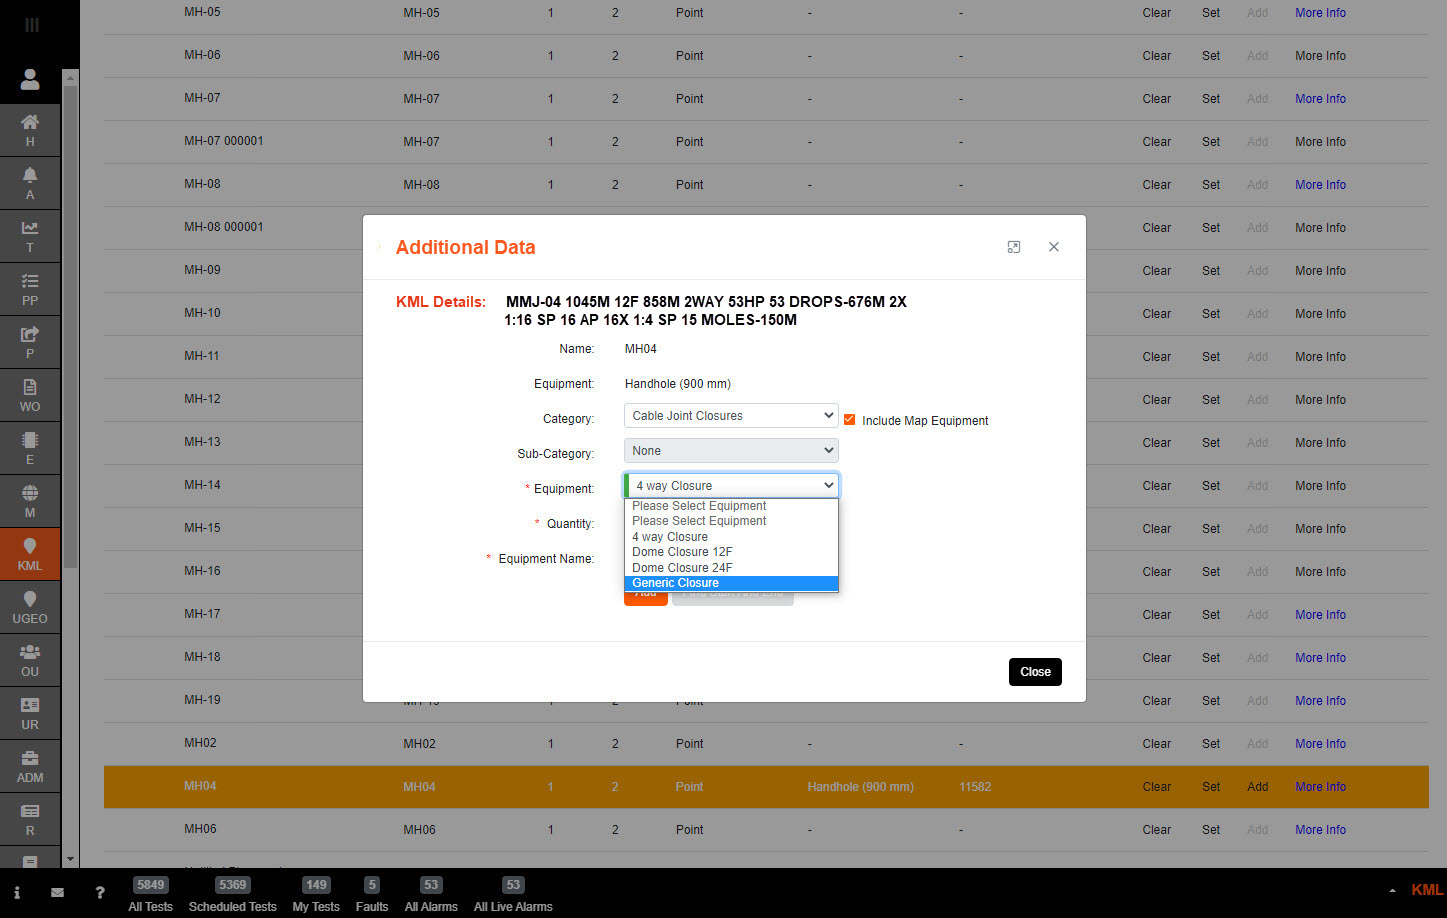
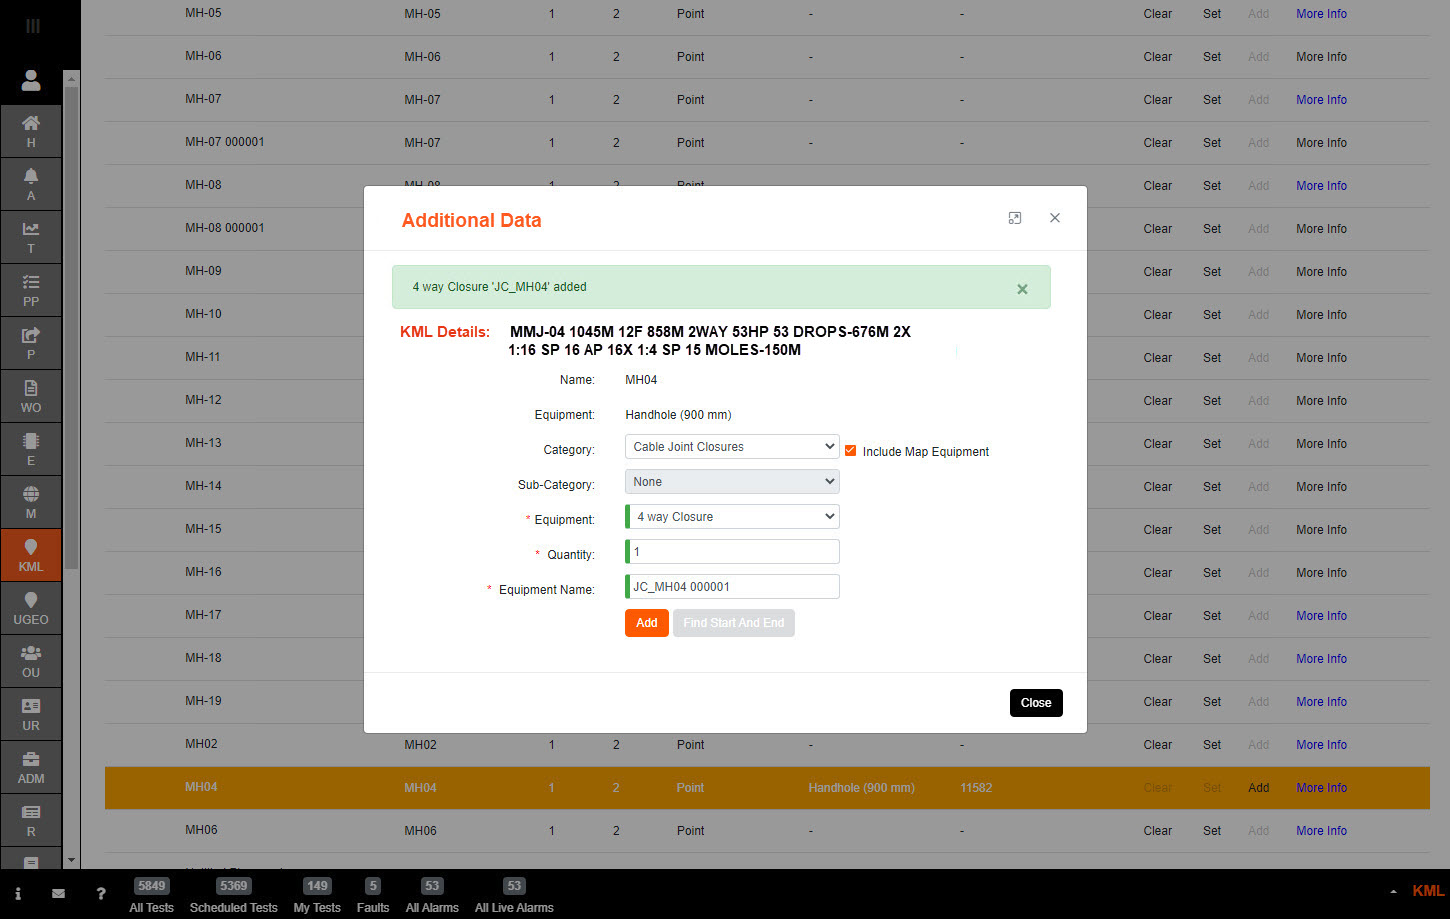
A joint closure Name will automatically be entered for ease, but this can be modified to suit.
Select 'Add' and the closure will be added to the items that will be exported, as indicated on the green banner.
Once the closure is created then reselect the Category drop down and click on 'Splitters'.
Next choose the type of splitter you will need to create in the Equipment drop down
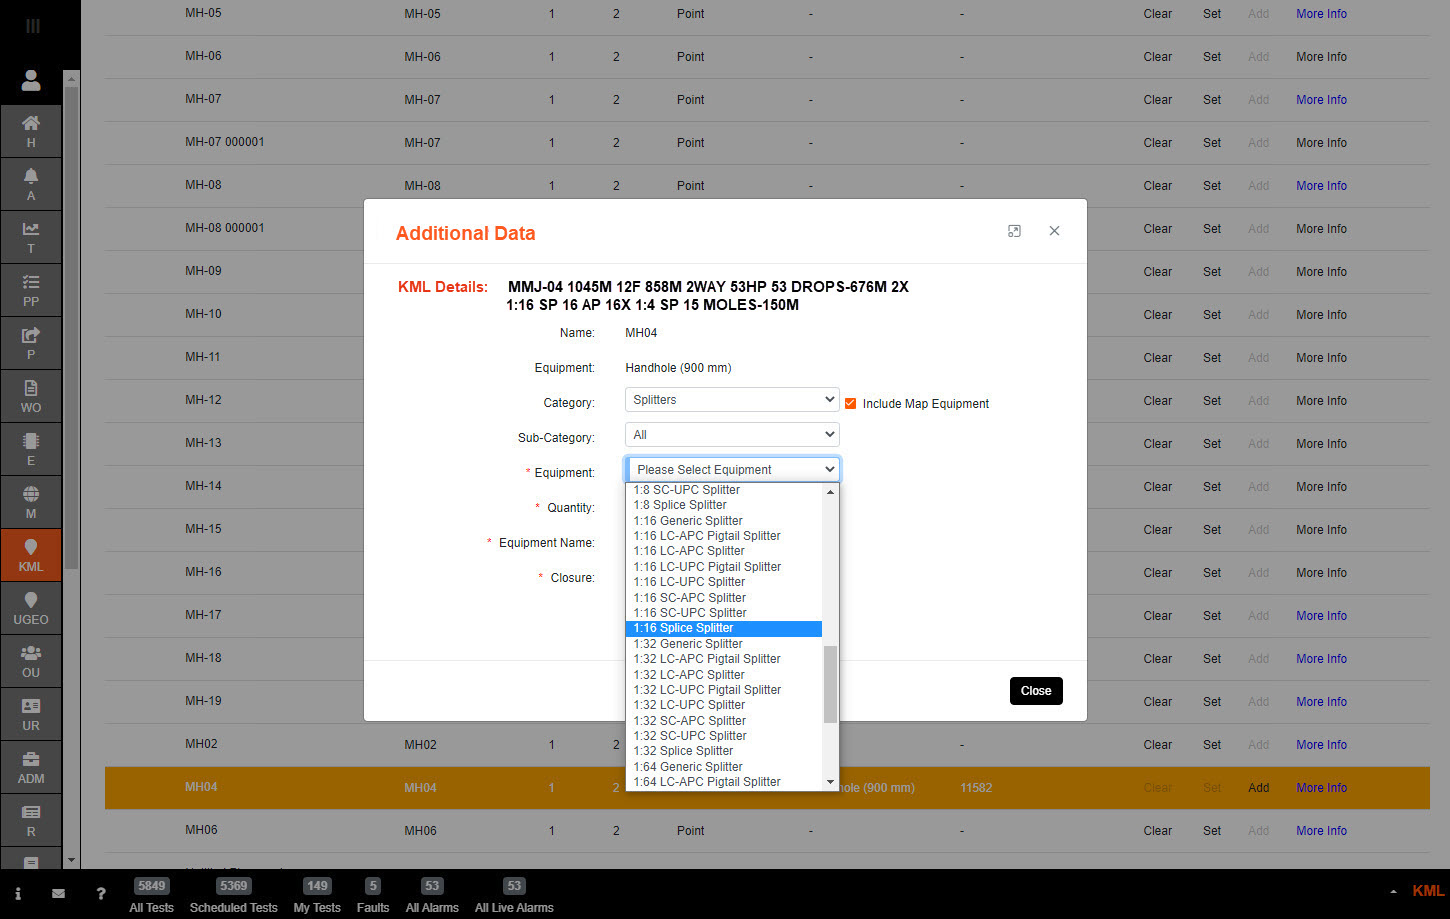
Add the Quantity required to add.
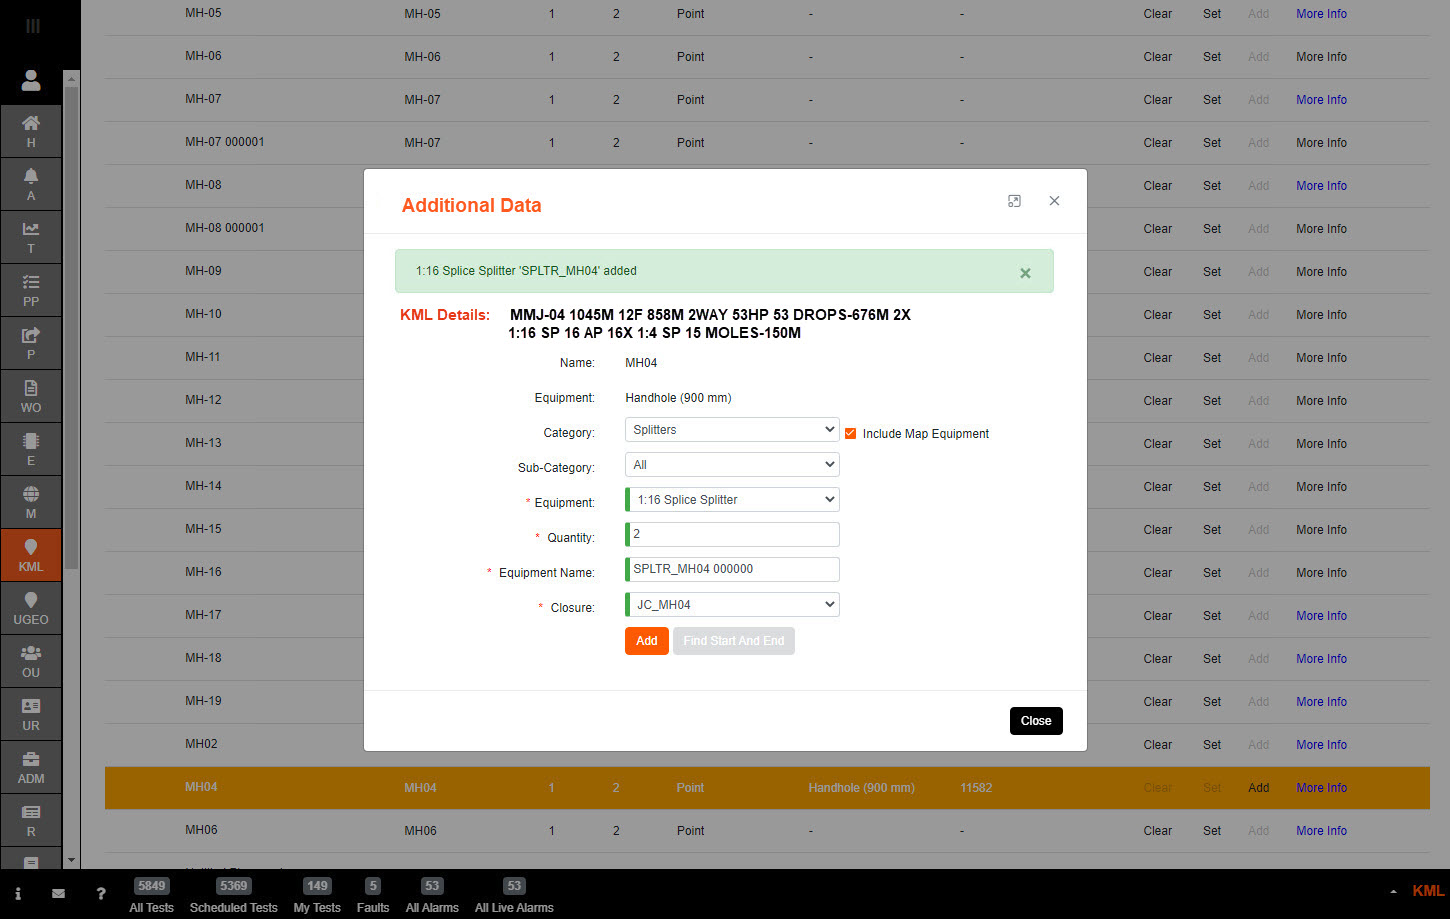
A splitter Name will automatically be entered for ease, but this can be modified to suit.
The Closure will automatically be selected from the one you just added.
Select 'Add' and the splitter(s) will be added to the items that will be exported, as indicated on the green banner.
If any other types of splitters are indicated as required then choose the new type of splitter you will need to create in the Equipment drop down.
Add the Quantity required to add.
A splitter Name will automatically be entered for ease, but this can be modified to suit.
The Closure will automatically be selected from the one you previously added.
Select 'Add' and the splitter(s) will be added to the items that will be exported, as indicated on the green banner.
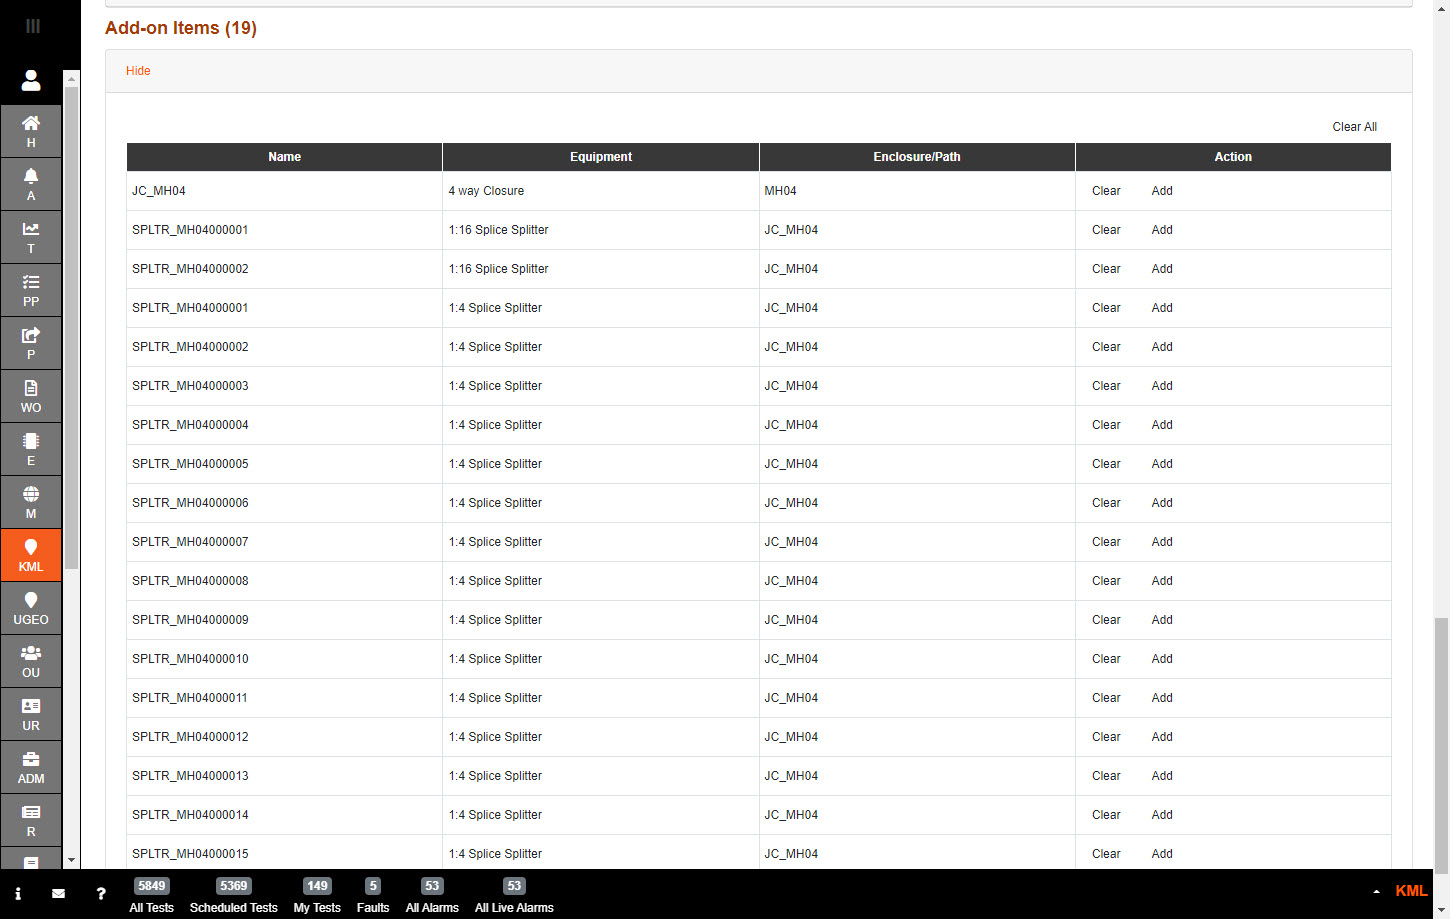
To check the items you created, scroll down to 'Add-on Items' and access the list.
We should have the items added for MH04; the Closure, 2 x 1:16 Splitters and 16 x 1:4 Splitters
Navigating back to the original cable we were trying to create - the closure we created in MH04 is available, but a closure is still required for AP6 before we can complete creating the cable.
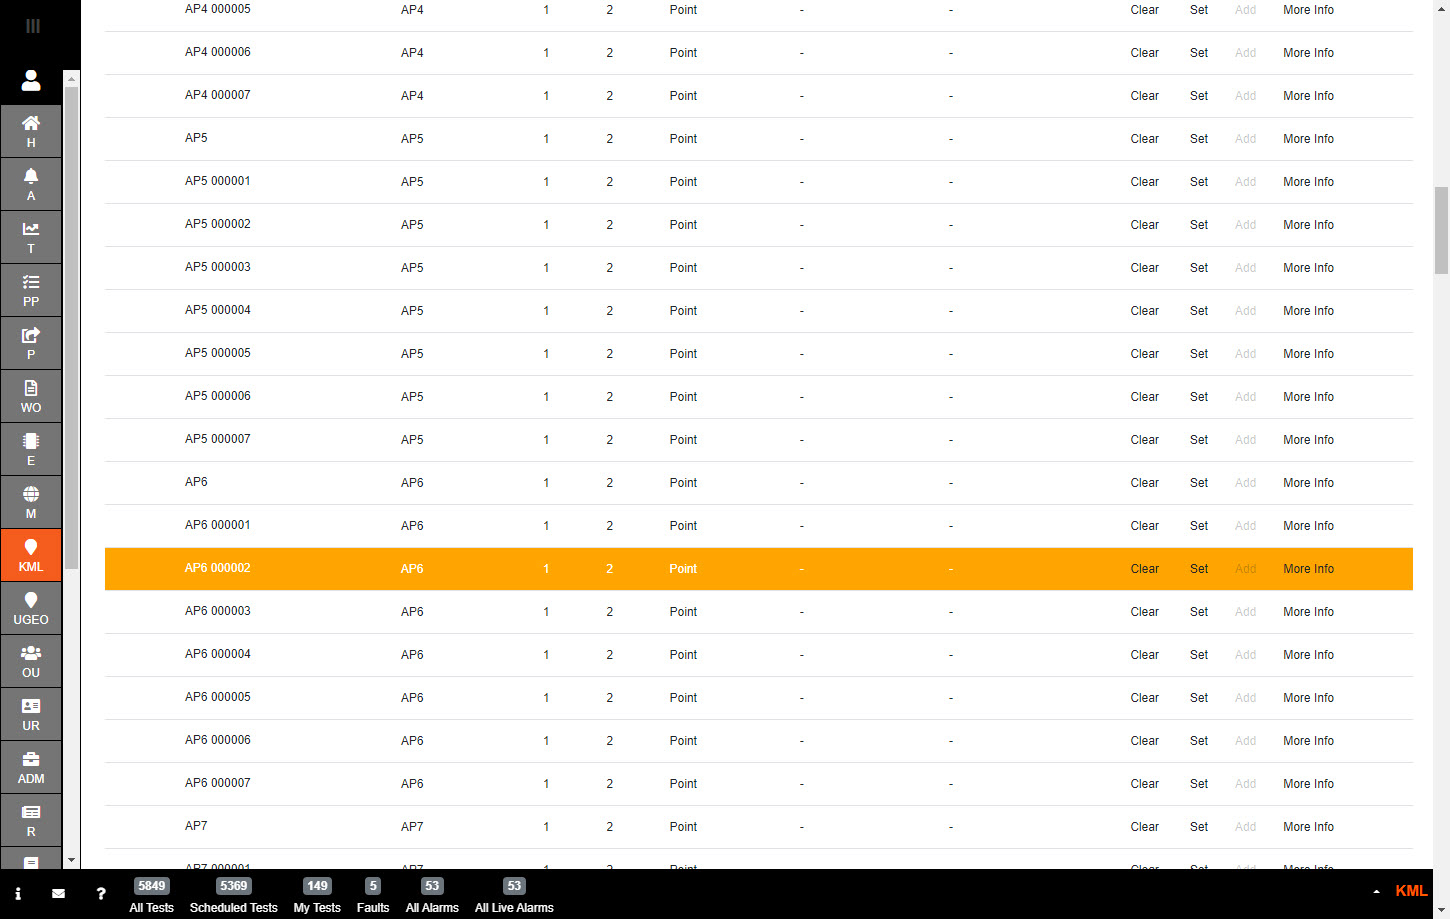
Click on the AP6 hyperlink.
The hyperlink will highlight the item in the tree. You might need to open the Full Tree, and scroll down if not obvious.
Select 'Set' and the KML Type will either pop up from your previously set up 'auto select', or from the 'active assign type' selected above the tree.
We already know that the customer prefers Boundary Boxes for their Access Points - so click on 'Manholes' in order to change the type.
Select Boundary Box from the drop down. Select 'Set' in order to apply it.
Repeat the same actions as you did for MH04 above.
Choose the type of joint closure you will need to create in the Equipment drop down

A joint closure Name will automatically be entered for ease, but this can be modified to suit.
Select 'Add' and the closure will be added to the items that will be exported, as indicated on the green banner.
Navigating back to cable R1 344M 12F - both the closures we created for MH04 and AP6 are now available.
Now we can add the duct in order to make the cable valid.
Next choose the type of duct you will need to create in the Equipment drop down
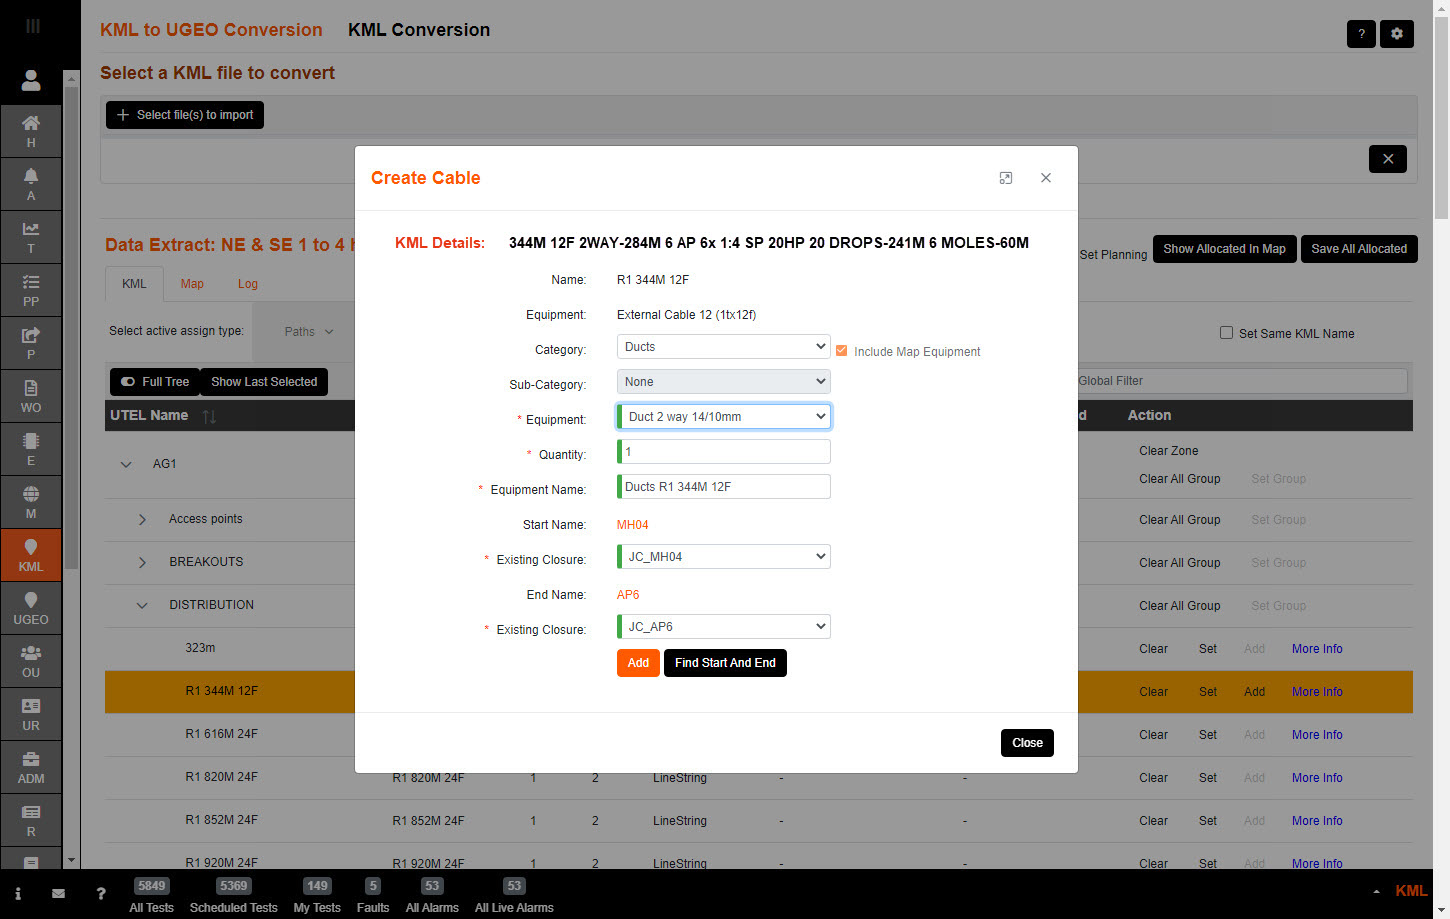
Select 'Add' and the duct will be added to the items that will be exported, as indicated on the green banner.
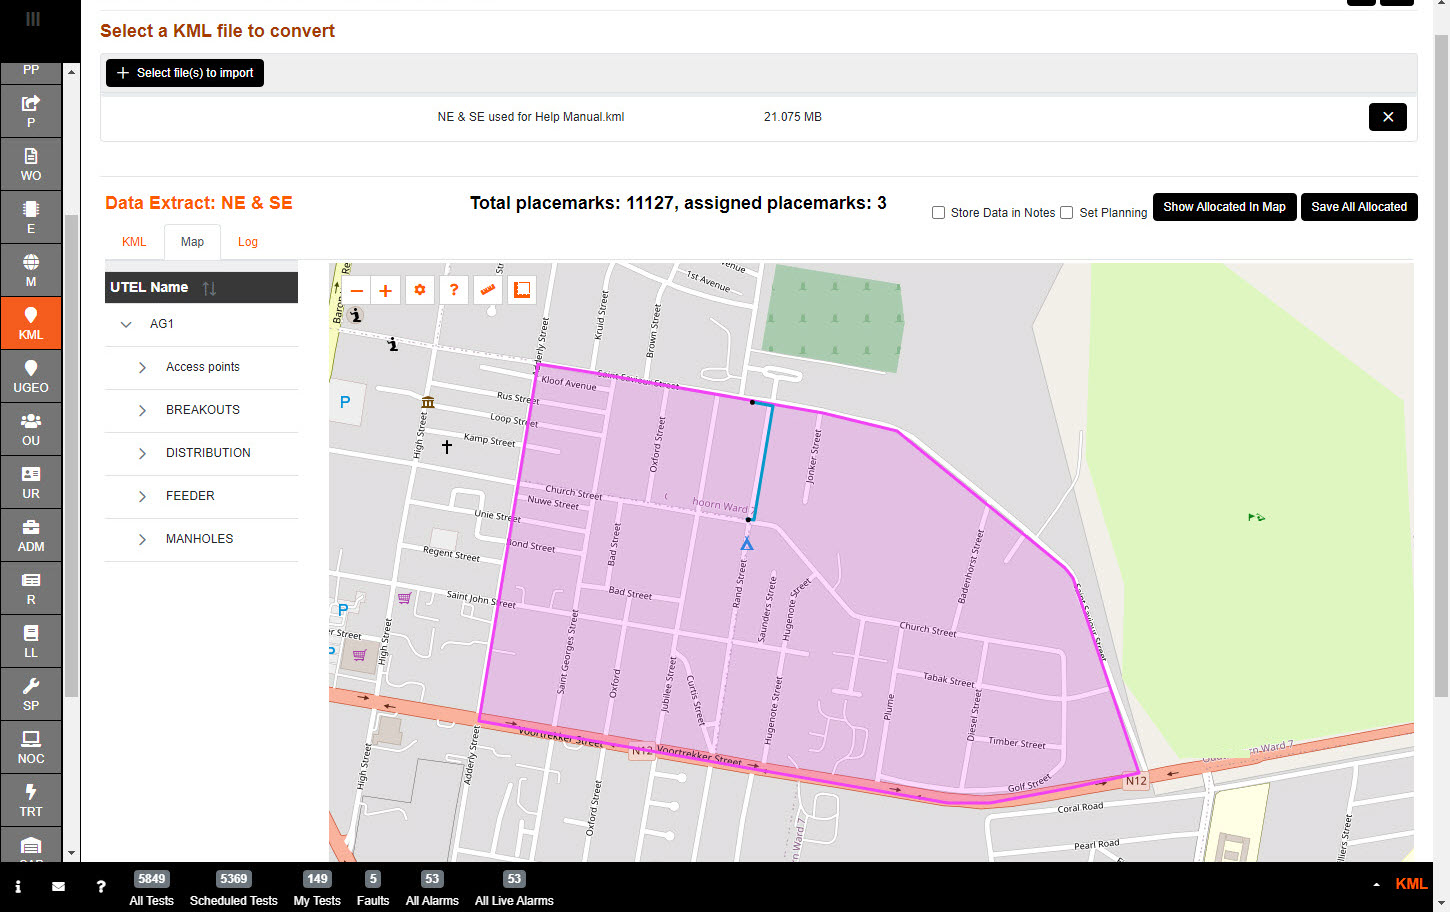
Selecting the Map tab (above the tree) will give you a view of the items you have added in order to verify.
Note: the 'assigned placemarks:' has increased from 0 to 3, after assigning the manholes and cable.
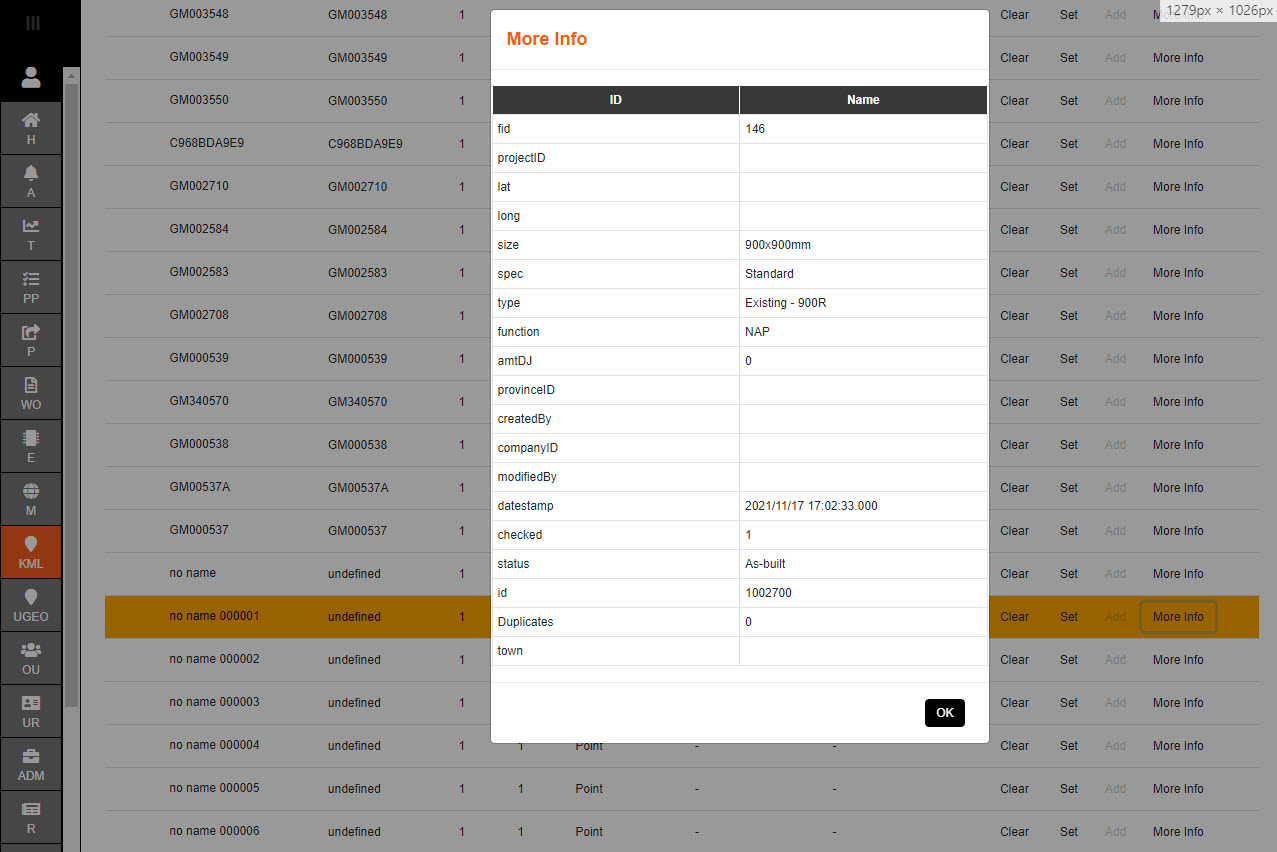
Some items might not have a name assigned if the Key Name (specified in Settings) is missing from the file.
When trying to add items that have no name - select More Info.
If the KML was created with a tables then you have a chance to select a unique identifier by selecting the desired row.
In this example the id row is selected.
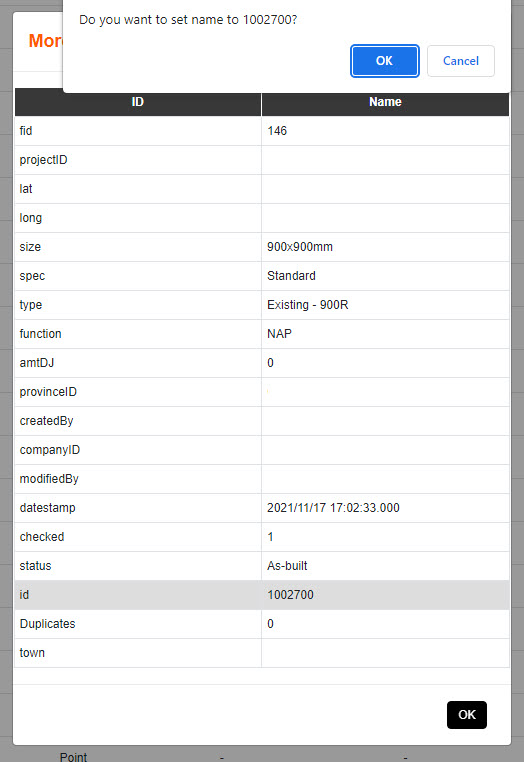
The user is prompted to acknowledge if the action would like to be processed.
Select OK.
When you are satisfied with creating items then the file can be saved.
The description of each item can be exported in the file and saves in the 'Note' field for reference if the 'Store Data in Notes' is ticked.
If the items created are for a project then tick the 'Set Planning' option.
All assignments are exported to a UGEO (json) file when 'Save all allocated' button is pressed.

Note:
Any items not added in this file can be added at a later stage, but will need to be saved as another UGEO file.